They are neural networks which are sparsely connected on the input layer in order to avoid overfitting. CNN are used as image classifier and they work on layer basis.
Every image is read by computer in digits at every pixel, with help of matrix.
Basically There are 3 channels R, G, B. Each layer has its own respective pixel value. Image size is written as 4x4x3 it means there are 4 rows, 4 columns and 3 channels. This is case for colored images, and for black and white images, and is only one 2D matrix.

[Image Source] - https://xrds.acm.org/blog/wp-content/uploads/2016/06/Figure1.png
If an image has 200x200x3 pixels, feeding this image to a fully connected network then the total no. of ways required in first hidden layer is 120,000. So, there is huge parameter and more no. of neurons will be required that can lead to overfitting. That’s why we cannot use fully connected network for image classification.
A neuron in a layer will only be connected to a small region of the layer before it, instead of all the neurons as in fully connected layer. Thus, we need to handle less amount of weights.
Input Image -> CNN -> Classified Image
CNN has following layers:
- Convolutional
- ReLU Layer
- Pooling
- Fully Connected
CNN compares the images piece by piece. The pieces that it looks for are called features.
Feature Detector – usually 3*3 matrix
Input image * feature detector = Feature Map
Feature map is the smaller version of the input image, because it is easy and faster to process the smaller image thus we perform a dot product between our image and filters.
We can take more than one feature detector.
Steps:
- Line up the feature and the image
- Multiply each image by corresponding feature pixel
- Add them up
And now, put the value in the position of that pixel. Similarly move the feature to every position of the image. We will get a matrix, of random decimal numbers.

[Image Source] - http://cambridgespark.com/content/tutorials/convolutional-neural-networks-with-keras/figures/convolve.png
In this layer, we remove the negative values from the filtered images and replaces them with 0.
It is an activation function. It has value 0 until a threshold value doesn’t occur, and after that certain value it shows linear relationship. This is done to avoid the output 0 during the summation of matrix.
f(x) = 0 if x<0 or x if x>=0

[Image Source] - https://cdn-images-1.medium.com/max/1600/1*6HyqifN4M_bJ7DTJ0RFRJA.jpeg
The use of this layer is to shrink the image into smaller size.
Steps:
- Pick a window size (usually 2 or 3)
- Pick a stride – (stride is the distance by which your window moves to another pixel).
- Walk your window across your filtered images.
- From each window, take the maximum value.
[Image Source] - https://qph.fs.quoracdn.net/main-qimg-8afedfb2f82f279781bfefa269bc6a90
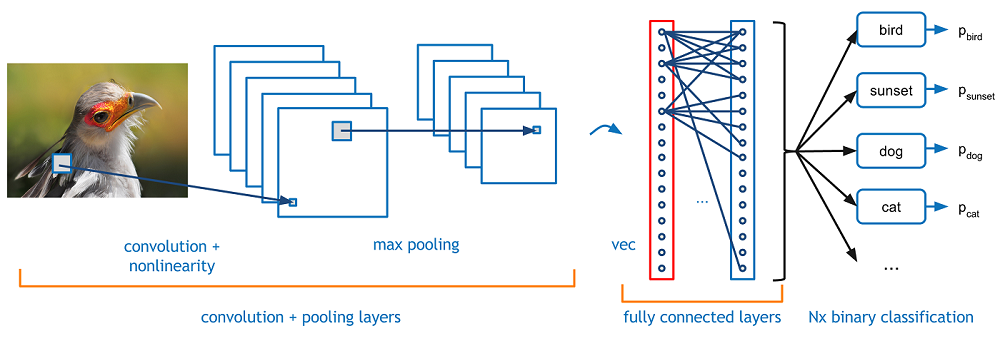
This is the final layer where the actual classification happens.
We take our filtered and shrinked images and put them into a single list (vector).
There will be some elements which have high values for an IMAGE A and rest of the pixels will be show low values.
For IMAGE B there will be some other pixels which shows high value, and rest will be close to 0.
Thus, using this last vector we can classify whether the new image belong to category A or B by comparing the elements which are high in that vector.
The image is classified as X since it has more probability.
Combining All Layers
[Image Source] - https://adeshpande3.github.io/assets/Cover.png