Controlling a Gaggia with a Raspberry Pi
This is very simple software for using a Raspberry Pi to control the boiler of a Gaggia Classic espresso machine. Right now, it uses a proportional-integral-derivative (PID) control loop to keep the boiler temperature more constant than the Gaggia's standard thermostat can, and also logs temperature and displays it on a webpage. It may do other things at some point in the future.
To measure the boiler temperature, I use a DS18B20 thermometer wired in the standard (not phantom power) way. I will upload an actual circuit diagram soon, but in the meantime, see Figure 7 of the datasheet.
You'll also need to enable the thermometer by adding the following line to
/boot/config.txt:
dtoverlay=w1-gpio,gpiopin=4
You can change gpiopin to whatever pin you actually want to use. Be sure to
specify the pin with the broadcom numbering scheme.
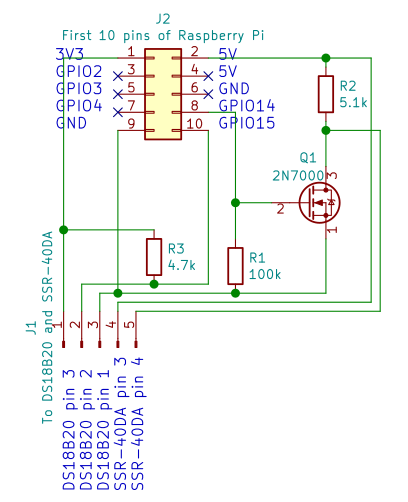
To control the boiler, I replaced the Gaggia's brew thermostat with a
Fotek SSR-40DA relay controlled by the Pi. Here is a complete circuit diagram:
First, install the requirements:
sudo apt-get install sqlite3 python3-pip git
Then, download and install piggia:
git clone --recursive https://github.com/esrice/piggia.git
cd piggia
sudo pip3 install .
Next, edit config.yaml to tell it where to store the database, what pin
to use for the relay, how long to wait between temperature measurements, etc.
Finally, add the following lines to /etc/rc.local to make the temperature
controller and web server start running automatically when the Raspberry Pi
starts up:
controller /path/to/config.yaml &
app /path/to/config.yaml &
You can run these in a terminal too, of course. You should now have a little
webpage showing the current temperature and a plot of past temperatures at
http://raspberrypi.local:5000.
This blog post was incredibly helpful for figuring out the hardware end of this project.